The Building Blocks of Modular

I walked into my favorite brick and mortar Eurorack storefront last week: Perfect Circuit Audio in Burbank, California. They are a truly marvelous shop, loaded to the brim with modular gear and electronic music accoutrements. But I was immediately struck by something: it seemed that nearly every module was quite wide, and festooned with loads of blinking lights and colorful displays. It feels like the ever-expanding market of Eurorack modules are getting larger, more complex, and more eye-catching.

I’m not a Luddite by any means, and am all for development and expansion of design. But I can’t help but feel that we are getting away from the basics that make creating modular synth music a unique experience. In my mind, the whole point of carefully selecting fundamental building blocks of synthesis like oscillators, filters, and envelope generators is to create a system that is uniquely your own, reflecting what your particular interest and aesthetic is. There are several benefits to buying smaller, simpler modules to build up your system:

  • You really learn the fundamentals of synthesis by exploring each element a function at a time
  • It is more affordable to purchase smaller, less expensive modules as you can pay for them, allowing you to relish the slow expansion of your instrument
  • You can create an instrument that really reflects what you want to do – which will slowly change over time the more you work with what you have.

To be clear, I love some of the amazing complex modules that are available today. I use Maths, Clouds, and Bitbox constantly, and they fulfill critical functions in my instrument. But the majority of my modules are more fundamental, and taking that approach has really allowed me to build something slowly that I really love and know well.

Unscrambling the spaghetti: Tips to make your patch cables a little easier to grok

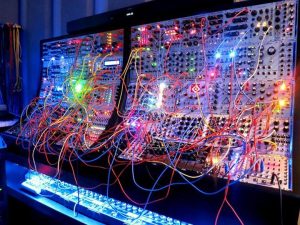
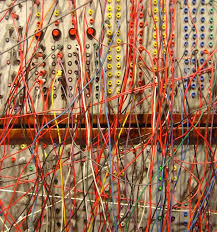
One of the really cool aspects of modular synthesis is how the system looks when patched up: a colorful, higgeldy-piggeldy crazy network of patch cables, stretching hither and yon across the instrument in a nearly indecipherable tangle.

And while this looks really great, cementing your image as a wild-eyed techno-genius, it can be a little bit hard to follow. I have certainly noticed that in coming back to a patch that I created a day or more previously, I have to spend a bunch of time following the perplexing web of signal paths, to remind me of what goes where. So I present a couple of ideas that will not eliminate the problem, but might help keep down the clutter a bit.

Use black cables for permanently wired connections

While I like to strip things down to a blank slate, there are always a number of connections that are (semi-) permanently connected in my system. My master clock, a Pamela’s Workout creates a series of pulses at various time divisions which feed, among other things, variable delays to create swing time, and a clock divider. At the other end of the line, my mixer’s master outs go to a mult, which then feed a headphone amp, an Intellijel audio output for connecting to the outside world, and my 1010 Music Bitbox, which I use for recording my patches and performances.

Each of those connections are done using black cables. Why? Because black fades into the background, allowing me to use my colored cables for the temporary connections. When I am ready to tear down a patch to make room for something new, I leave all the black cables in place. As an added benefit, they are also cheaper than colored cables, and readily available at electronics stores and websites like mycablemart.com.

Have a variety of cable lengths available

Having cables that will drape nicely without hanging down too far, will help keep the visual clutter down. I have cables in every length I can find, from 3 inches up to 3 feet. Having them color coded by length also makes it faster and easier to find the right size: my yellows are short, greens and blues are medium, and reds are long.

Smooth out the bends

I’ve purchased a lot of cables that come folded up into little bundles. That may make it easy to ship, but when you unwrap the cable, it has bends all throughout that keep it from draping nicely. I have found a technique that works to tame the bends, making the cable lie much straighter:

  1. Wrap the cable(s) around the top of the outside rim of a pot. Use paper clips to hold them in place. Make the wrap reasonably tight, so that it is strung fairly straight.
  2. Boil water in a kettle. Do not boil it in the pot the cables are tied around.
  3. When boiling, pour water into the pot up to the level of the cables.
  4. Leave the cables and pot until the water cools back down to room temperature. Voila! Straighter cables.

Use thick, cloth-wrapped patch cables

Far and away, my favorite patch cables come from Modular Addict. They have cables that have a cloth mesh surface, that are thicker than your standard patch cables, and drape very nicely. They have them in a variety of colors and sizes, so you can organize length by color, as mentioned above.

Use Velcro cable ties for big clusters of cables

If you are planning to use a patch for live performance, you can use Velcro cable ties, wrapped at strategic points, to cluster cables together. This can open up space for you to get your hand in and twiddle those knobs.

Hope these tips help turn your nest of cables into…a slightly less chaotic nest of cables.


Best. NAMM Booth. Ever.

Remembering our heroes

I write this on the last night of Barack Obama’s presidency. As we sit on the cusp of a new and entirely chilling era, I’ve felt a sick feeling of dread all day as I roamed the aisles of the NAMM.

But one booth was amazing. Something I had never seen before, and so appropriate for this show.

You see, 2016 was appalling beyond measure for a number of reasons. Not the least of which was the unbelievable number of incredible musicians that left us. This number, for some reason, was disproportionally represented by so many of the legends of electronic music.

And so Moog Music created an unbelievable piece of art. They had no synthesizers on the show floor. Nothing to sell.

They had a giant wall with drawings of Pauline Oliveros, Don Buchla, Jean Jacques Perry, Isao Tomita, Bernie Worrell, and Keith Emerson – all electronic music legends, and all who died in 2016.

They then handed out little personal music players, that you listened to while walking a maze of remembrance, peppered with quotes from and about these amazing artists. You then used Twitter or Instagram to send a fond thought or picture, celebrating these artists. Your reward was a small notebook to remember them by, or perhaps a Moog synth, or VIP tickets to Moogfest.

I celebrated the life of Pauline Oliveros, who had been my teacher. But I remembered seeing Don Buchla so many times around the halls of Mills College, and working with Keith Emerson once on a multimedia project. How many people’s lives had been touched by these great artists?

I stand, with the rest of my country and the world, on the precipice of despair. I am looking down the abyss into a cauldron of misery, corruption, and deception. I will pay no attention to the proceedings in Washington tomorrow, where a great man will leave and a despicable one will take his place.

But while I’m busy not thinking about our future, I take comfort in our past. Thanks Keith, Pauline, and Don. Thanks for contributing beauty to the world, and for helping to make me who I am.